前言
以下所有示例中使用的JDK版本: 8
以下所有示例中使用的maven依赖如下
        <dependency>
            <groupId>io.netty</groupId>
            <artifactId>netty-all</artifactId>
            <version>4.1.39.Final</version>
        </dependency>

        <dependency>
            <groupId>org.projectlombok</groupId>
            <artifactId>lombok</artifactId>
            <version>1.18.38</version>
        </dependency>

        <dependency>
            <groupId>com.google.code.gson</groupId>
            <artifactId>gson</artifactId>
            <version>2.13.1</version>
        </dependency>

        <dependency>
            <groupId>com.google.guava</groupId>
            <artifactId>guava</artifactId>
            <version>19.0</version>
        </dependency>

        <dependency>
            <groupId>ch.qos.logback</groupId>
            <artifactId>logback-classic</artifactId>
            <version>1.5.18</version>
        </dependency>
1. 三大组件
1.1 Channel & Buffer
channel有一点类似于stream, 它是读写数据的双向通道, 可以从channel将数据读入buffer, 也可以将buffer的数据写入channel. 而stream要么是输入, 要么是输出. channel要比stream更底层.
常见的channel有:
FileChannel:
文件的数据传输通道
DatagramChannel:
做UDP网络编程时用的数据传输通道
SocketChannel:
TCP网络编程时用的数据传输通道
服务器端和客户端都能用
ServerSocketChannel
TCP网络编程时用的数据传输通道
专用于服务器端
buffer则用来缓冲读写数据.
常见的buffer有:
ByteBuffer:
MappedByteBuffer
DirectByteBuffer
HeapByteBuffer
ShortBuffer
IntBuffer
LongBuffer
FloatBuffer
DoubleBuffer
CharBuffer
1.2 Selector
selector 单从字面意思不好理解,需要结合服务器的设计演化来理解它的用途
多线程版设计
思路:
每个线程维护一个客户端的socket连接
以餐厅为例, 给每个客人都安排一个服务员
缺点:
内存占用高
线程上下文切换成本高
只适合连接数较少的场景
线程池版设计
思路:
使用线程池限制线程数量, 避免线程上下文切换开销过大
缺点:
阻塞模式下, 线程仅能处理一个socket连接, 当前socket连接期间另一个socket需等待
只适合短连接场景
Selector版设计
selector的作用就是配合一个线程来管理多个channel, 获取这些channel上发生的事件.
这些channel工作在非阻塞模式下, 不会让线程吊死在一个channel上.
适合连接数多, 但流量低的场景.
调用selector的select()会阻塞直到channel发生了读写就绪事件. 这些事件发生时select方法会返回这些事件交给thread来处理.
2. ByteBuffer
2.1 ByteBuffer的使用方式
向 buffer 写入数据,例如调用 channel.read(buffer)
调用flip()切换到读模式
从buffer中读取数据
调用clear()或者compact()切换到写模式
重复以上四步
示例:
准备一个文本文件data.txt, 文件内容为abcdefghijklmnopqrstuvwxyz1234567890ABCDEFGHIJKLMNOPQRSTUVWXYZ
使用FileChannel来读取文件内容
import lombok.extern.slf4j.Slf4j;

import java.io.FileInputStream;
import java.io.IOException;
import java.nio.ByteBuffer;
import java.nio.channels.FileChannel;

@Slf4j
public class ByteBufferTest {
    public static void main(String[] args) {
        try (FileChannel channel = new FileInputStream("data.txt").getChannel()) {
            // 准备缓冲区, 大小为10个字节, 初始默认为写入模式
            ByteBuffer byteBuffer = ByteBuffer.allocate(10);
            do {
                // 从channel读取一次数据, 写入到buffer
                int readLength = channel.read(byteBuffer);
                // 如果当前读取到的长度为-1, 说明已经没有数据了
                if (readLength == -1) {
                    log.info("读取完毕!");
                    break;
                }
                log.info("读取到{}个字节", readLength);
                // 切换到读模式
                byteBuffer.flip();
                // 当有剩余数据时, 逐个字节读取(也可以指定每次读取的字节长度)并打印
                while (byteBuffer.hasRemaining()) {
                    byte b = byteBuffer.get();
                    log.info("读取到的内容: {}", (char) b);
                }
                // 切换到写模式, 如果不切换, 后续会重复读取本次的数据
                byteBuffer.clear();
            } while (true);
        } catch (IOException e) {
        }
    }
}
2.2 ByteBuffer的结构
ByteBuffer有几个重要属性
capacity: 容量
position: 指针
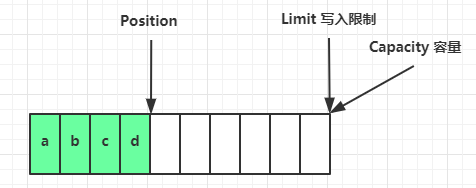
limit: 写入限制
一开始

写模式下, position为写入位置, limit等于容量, 下图为写入了4个字节后的状态
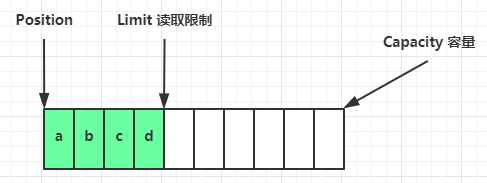
flip动作发生后, position切换为读取位置, limit切换为读取限制, 如下图
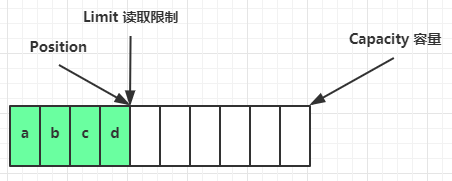
读取4个字节后, 状态如下图
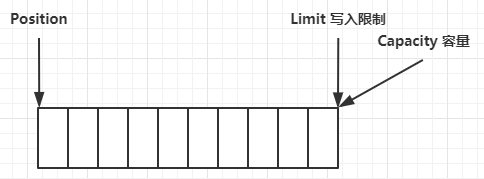
clear动作发生后, 恢复到初始状态, 如下图
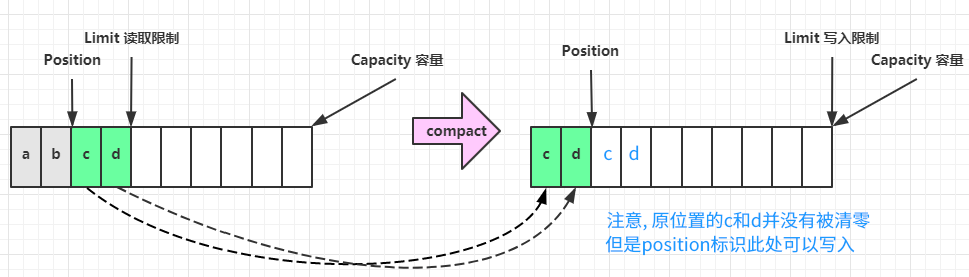
compact 方法,是把未读完的部分向前压缩,然后切换至写模式
ByteBuffer调试工具类
import io.netty.util.internal.StringUtil;

import java.nio.ByteBuffer;

import static io.netty.util.internal.MathUtil.isOutOfBounds;
import static io.netty.util.internal.StringUtil.NEWLINE;

public class ByteBufferUtil {
    private static final char[] BYTE2CHAR = new char[256];
    private static final char[] HEXDUMP_TABLE = new char[256 * 4];
    private static final String[] HEXPADDING = new String[16];
    private static final String[] HEXDUMP_ROWPREFIXES = new String[65536 >>> 4];
    private static final String[] BYTE2HEX = new String[256];
    private static final String[] BYTEPADDING = new String[16];

    static {
        final char[] DIGITS = "0123456789abcdef".toCharArray();
        for (int i = 0; i < 256; i++) {
            HEXDUMP_TABLE[i << 1] = DIGITS[i >>> 4 & 0x0F];
            HEXDUMP_TABLE[(i << 1) + 1] = DIGITS[i & 0x0F];
        }

        int i;

        // Generate the lookup table for hex dump paddings
        for (i = 0; i < HEXPADDING.length; i++) {
            int padding = HEXPADDING.length - i;
            StringBuilder buf = new StringBuilder(padding * 3);
            for (int j = 0; j < padding; j++) {
                buf.append("   ");
            }
            HEXPADDING[i] = buf.toString();
        }

        // Generate the lookup table for the start-offset header in each row (up to 64KiB).
        for (i = 0; i < HEXDUMP_ROWPREFIXES.length; i++) {
            StringBuilder buf = new StringBuilder(12);
            buf.append(NEWLINE);
            buf.append(Long.toHexString(i << 4 & 0xFFFFFFFFL | 0x100000000L));
            buf.setCharAt(buf.length() - 9, '|');
            buf.append('|');
            HEXDUMP_ROWPREFIXES[i] = buf.toString();
        }

        // Generate the lookup table for byte-to-hex-dump conversion
        for (i = 0; i < BYTE2HEX.length; i++) {
            BYTE2HEX[i] = ' ' + StringUtil.byteToHexStringPadded(i);
        }

        // Generate the lookup table for byte dump paddings
        for (i = 0; i < BYTEPADDING.length; i++) {
            int padding = BYTEPADDING.length - i;
            StringBuilder buf = new StringBuilder(padding);
            for (int j = 0; j < padding; j++) {
                buf.append(' ');
            }
            BYTEPADDING[i] = buf.toString();
        }

        // Generate the lookup table for byte-to-char conversion
        for (i = 0; i < BYTE2CHAR.length; i++) {
            if (i <= 0x1f || i >= 0x7f) {
                BYTE2CHAR[i] = '.';
            } else {
                BYTE2CHAR[i] = (char) i;
            }
        }
    }

    /**
     * 打印所有内容
     *
     * @param buffer
     */
    public static void debugAll(ByteBuffer buffer) {
        int oldlimit = buffer.limit();
        buffer.limit(buffer.capacity());
        StringBuilder origin = new StringBuilder(256);
        appendPrettyHexDump(origin, buffer, 0, buffer.capacity());
        System.out.println("+--------+-------------------- all ------------------------+----------------+");
        System.out.printf("position: [%d], limit: [%d]\n", buffer.position(), oldlimit);
        System.out.println(origin);
        buffer.limit(oldlimit);
    }

    /**
     * 打印可读取内容
     *
     * @param buffer
     */
    public static void debugRead(ByteBuffer buffer) {
        StringBuilder builder = new StringBuilder(256);
        appendPrettyHexDump(builder, buffer, buffer.position(), buffer.limit() - buffer.position());
        System.out.println("+--------+-------------------- read -----------------------+----------------+");
        System.out.printf("position: [%d], limit: [%d]\n", buffer.position(), buffer.limit());
        System.out.println(builder);
    }

    private static void appendPrettyHexDump(StringBuilder dump, ByteBuffer buf, int offset, int length) {
        if (isOutOfBounds(offset, length, buf.capacity())) {
            throw new IndexOutOfBoundsException(
                    "expected: " + "0 <= offset(" + offset + ") <= offset + length(" + length
                            + ") <= " + "buf.capacity(" + buf.capacity() + ')');
        }
        if (length == 0) {
            return;
        }
        dump.append(
                "         +-------------------------------------------------+" +
                        NEWLINE + "         |  0  1  2  3  4  5  6  7  8  9  10 11 12 13 14 15|" +
                        NEWLINE + "+--------+-------------------------------------------------+----------------+");

        final int startIndex = offset;
        final int fullRows = length >>> 4;
        final int remainder = length & 0xF;

        // Dump the rows which have 16 bytes.
        for (int row = 0; row < fullRows; row++) {
            int rowStartIndex = (row << 4) + startIndex;

            // Per-row prefix.
            appendHexDumpRowPrefix(dump, row, rowStartIndex);

            // Hex dump
            int rowEndIndex = rowStartIndex + 16;
            for (int j = rowStartIndex; j < rowEndIndex; j++) {
                dump.append(BYTE2HEX[getUnsignedByte(buf, j)]);
            }
            dump.append(" |");

            // ASCII dump
            for (int j = rowStartIndex; j < rowEndIndex; j++) {
                dump.append(BYTE2CHAR[getUnsignedByte(buf, j)]);
            }
            dump.append('|');
        }

        // Dump the last row which has less than 16 bytes.
        if (remainder != 0) {
            int rowStartIndex = (fullRows << 4) + startIndex;
            appendHexDumpRowPrefix(dump, fullRows, rowStartIndex);

            // Hex dump
            int rowEndIndex = rowStartIndex + remainder;
            for (int j = rowStartIndex; j < rowEndIndex; j++) {
                dump.append(BYTE2HEX[getUnsignedByte(buf, j)]);
            }
            dump.append(HEXPADDING[remainder]);
            dump.append(" |");

            // Ascii dump
            for (int j = rowStartIndex; j < rowEndIndex; j++) {
                dump.append(BYTE2CHAR[getUnsignedByte(buf, j)]);
            }
            dump.append(BYTEPADDING[remainder]);
            dump.append('|');
        }

        dump.append(NEWLINE +
                "+--------+-------------------------------------------------+----------------+");
    }

    private static void appendHexDumpRowPrefix(StringBuilder dump, int row, int rowStartIndex) {
        if (row < HEXDUMP_ROWPREFIXES.length) {
            dump.append(HEXDUMP_ROWPREFIXES[row]);
        } else {
            dump.append(NEWLINE);
            dump.append(Long.toHexString(rowStartIndex & 0xFFFFFFFFL | 0x100000000L));
            dump.setCharAt(dump.length() - 9, '|');
            dump.append('|');
        }
    }

    public static short getUnsignedByte(ByteBuffer buffer, int index) {
        return (short) (buffer.get(index) & 0xFF);
    }

    public static void main(String[] args) {
        ByteBuffer buffer = ByteBuffer.allocate(10);

        // 写入一个小写字母a
        buffer.put((byte) 'a');
        // 此时position应该为1, limit固定为10
        debugAll(buffer);
        // 写入更多内容
        buffer.put(new byte[]{'b', 'c', 'd', 'e'});
        // 此时position应该为5, limit固定为10
        debugAll(buffer);

        System.out.println("=================");
        // 切换到读模式
        buffer.flip();
        // 此时position应该为0, limit限制为5
        debugAll(buffer);
        // 读取一个字节, 读到的应该是'a'
        System.out.println("读取到的是: " + (char) buffer.get());
        // 此时position应该为1, limit限制为5
        debugAll(buffer);

        System.out.println("=================");
        // 使用compact方法压缩掉已读取的内容, 切换到写模式
        buffer.compact();
        // 此时position应该为4, limit回到固定值10
        // 注意此处position为4的位置原有的内容并没有被清零, 只是标识从这里开始写入
        debugAll(buffer);

        System.out.println("=================");
        // 切换到读模式
        buffer.flip();
        // 读取一个字节, 读到的应该是'b'
        System.out.println("读取到的是: " + (char) buffer.get());
        // 此时position应该为1, limit为4
        debugAll(buffer);
        // 注意, 即使读所有的内容, 由于limit限制, 上一步未被清零的内容也不会被读取到
    }
}
2.3 ByteBuffer常见方法
2.3.1 分配空间
可以使用allocate方法或者allocateDirect方法为ByteBuffer分配空间, 其他Buffer类也有此方法
ByteBuffer buffer1 = ByteBuffer.allocate(10);
ByteBuffer buffer2 = ByteBuffer.allocateDirect(10);
注意: ByteBuffer分配的容量为固定的, 不能动态调整. 这一点与netty不同, netty进行了增强, 可以动态调整.
扩展知识
allocate方法分配的是堆内存
堆内存读写效率低
受GC影响
allocateDirect方法分配的是直接内存
直接内存读写效率高(少一次拷贝)
不受GC影响
分配速度慢
使用不当可能会造成内存泄漏, 需要手动释放(JDK9+可以使用try-with-resources)
最佳实践
尽量使用堆内内存(
ByteBuffer.allocate()),除非确实需要:与JNI交互
大文件内存映射
避免GC影响性能的特定场景
监控堆外内存使用:
# JVM参数
-XX:MaxDirectMemorySize=256m  # 限制直接内存大小
-XX:+DisableExplicitGC        # 谨慎使用,可能影响System.gc()效果
2.3.2 向buffer写入数据
有两种方法:
调用channel的read方法
int readLength = channel.read(buffer);
调用buffer的put方法
buffer.put((byte) 'a');
2.3.3 从buffer读取数据
有两种方法:
调用channel的write方法
int writeLength = channel.write(buffer);
调用buffer的get方法
byte b = buffer.get();
注意: get方法会让指针向后走, 如果想重复读取数据:
可以调用rewind方法将position将指针重置为0
或者调用get(int i)方法获取索引i的内容, 此方法不会移动指针
2.3.4 mark与reset
mark 是在读取时,做一个标记,即使 position 改变,只要调用 reset 就能回到 mark 的位置.
示例
import java.nio.ByteBuffer;

public class ByteBufferMarkTest {
    public static void main(String[] args) {
        ByteBuffer buffer = ByteBuffer.allocate(10);
        buffer.put(new byte[]{'a', 'b', 'c', 'd'});
        buffer.flip();

        // 读取出a和b
        System.out.println((char) buffer.get());
        System.out.println((char) buffer.get());
        // 标记
        buffer.mark();
        // 继续读取出c和d
        System.out.println((char) buffer.get());
        System.out.println((char) buffer.get());
        // 指针回到标记点
        buffer.reset();
        // 再次读取还是c和d
        System.out.println((char) buffer.get());
        System.out.println((char) buffer.get());
    }
}注意: rewind 和 flip 都会清除 mark 位置
2.3.5 字符串与ByteBuffer互相转换
import java.nio.ByteBuffer;
import java.nio.charset.StandardCharsets;

public class ByteBufferStringTest {
    public static void main(String[] args) {
        // 字符串转ByteBuffer, 分配空间大小为字符串占用的字节长度
        // 方式一: 字符串取字节数组, put到buffer中, 此时buffer处于写模式
        ByteBuffer buffer1 = ByteBuffer.allocate(16);
        buffer1.put("hello".getBytes(StandardCharsets.UTF_8));
        // 方式二: Charset, 此时buffer处于读模式
        ByteBuffer buffer2 = StandardCharsets.UTF_8.encode("你好1");
        // 方式三: wrap, 此时buffer处于读模式
        ByteBuffer buffer3 = ByteBuffer.wrap("hello".getBytes(StandardCharsets.UTF_8));

        // ByteBuffer转字符串, 要求buffer处理读模式
        String str1 = StandardCharsets.UTF_8.decode(buffer2).toString();
        System.out.println(str1);

    }
}
2.3.5 分散读
准备一个文本文件word.txt, 文件内容为onetwothree
使用FileChannel来读取文件内容到多个buffer中
import java.io.IOException;
import java.io.RandomAccessFile;
import java.nio.ByteBuffer;
import java.nio.channels.FileChannel;

import static cn.wenyuan.ByteBufferUtil.debugAll;

public class ByteBufferReadWriteTest {
    public static void main(String[] args) {
        try (FileChannel channel = new RandomAccessFile("word.txt", "r").getChannel()) {
            ByteBuffer buffer1 = ByteBuffer.allocate(3);
            ByteBuffer buffer2 = ByteBuffer.allocate(3);
            ByteBuffer buffer3 = ByteBuffer.allocate(5);
            // 一次性将数据读取到三个buffer中
            channel.read(new ByteBuffer[]{buffer1, buffer2, buffer3});
            // 将三个buffer切换到读模式
            buffer1.flip();
            buffer2.flip();
            buffer3.flip();
            // buffer1中保存的是one
            debugAll(buffer1);
            // buffer1中保存的是two
            debugAll(buffer2);
            // buffer1中保存的是three
            debugAll(buffer3);
        } catch (IOException e) {
        }
    }
}
2.3.6 集中写
准备一个文本文件word.txt, 文件内容为onetwothree
使用FileChannel来读取文件内容, 之后使用多个buffer写入内容到FileChannel
import java.io.IOException;
import java.io.RandomAccessFile;
import java.nio.ByteBuffer;
import java.nio.channels.FileChannel;
import java.nio.charset.StandardCharsets;

public class ByteBufferReadWriteTest {
    public static void main(String[] args) {
        // 准备两个buffer, 分别写入four和five
        ByteBuffer buffer1 = StandardCharsets.UTF_8.encode("four");
        ByteBuffer buffer2 = StandardCharsets.UTF_8.encode("five");
        try (FileChannel channel = new RandomAccessFile("word.txt", "rw").getChannel()) {
            // 一次性将多个buffer中的数据写入到channel中
            channel.write(new ByteBuffer[]{buffer1, buffer2});
            // 此时word.txt文件会被追加写入four和five两个单词
        } catch (IOException e) {
        }
    }
}
2.4 黏包与半包
网络上有多条数据发送给服务端,数据之间使用 \n 进行分隔.
但由于某种原因这些数据在接收时,被进行了重新组合,例如原始数据有3条为:
Hello,world\n
I'm zhangsan\n
How are you?\n
变成了下面的两个 byteBuffer
Hello,world\nI'm zhangsan\nHo
w are you?\n
其中被拼接起来的第一段称为黏包, 被截断的第二段称为半包.
原因: 这三条数据可能不是逐条发送的, 拼接后作为一条消息发送效率更高, 但是接收时缓冲区长度有限, 会把消息截断.
在实际网络编程中,处理粘包/半包通常有以下方案:
定长消息:每条消息固定长度
分隔符:例如用
\n分隔长度前缀:先发送消息长度,再发送内容
协议设计:如 HTTP 的 Content-Length
使用分隔符处理的示例
import java.nio.ByteBuffer;
import java.nio.charset.StandardCharsets;

import static cn.wenyuan.ByteBufferUtil.debugAll;

public class ByteBufferExamTest {
    public static void main(String[] args) {
        ByteBuffer buffer = ByteBuffer.allocate(32);
        buffer.put("Hello,world\nI'm zhangsan\nHo".getBytes(StandardCharsets.UTF_8));
        split(buffer);
        buffer.put("w are you?\nhaha!\n".getBytes());
        split(buffer);
    }

    /**
     * 以换行符为标识, 处理bytebuffer, 进行分段
     * @param source
     */
    public static void split(ByteBuffer source){
        // 切换到读模式
        source.flip();
        // 实际可读的上限
        int oldLimit = source.limit();
        for (int i = 0; i < oldLimit; i++) {
            // 如果当前字节是换行符, 需要截断出新的buffer
            if (source.get(i) == '\n') {
                // 将换行符之前的数据写入到新的bytebuffer中
                ByteBuffer target = ByteBuffer.allocate(i + 1 - source.position());
                source.limit(i + 1);
                target.put(source);
                source.limit(oldLimit);
                // 打印出新的buffer中的内容
                debugAll(target);
            }
        }
        // 切换到写模式, 且压缩掉已读数据
        source.compact();
    }
}
3. 网络编程
3.1 非阻塞 vs 阻塞
3.1.1 阻塞
阻塞模式下, 相关方法都会导致线程暂停
ServerSocketChannel.accept 会在没有连接建立时让线程暂停
SocketChannel.read 会在没有数据可读时让线程暂停
阻塞的表现其实就是线程暂停了,暂停期间不会占用 cpu,但线程相当于闲置
单线程下,阻塞方法之间相互影响,几乎不能正常工作,需要多线程支持
但多线程下,有新的问题,体现在以下方面:
32 位 jvm 一个线程 320k,64 位 jvm 一个线程 1024k,如果连接数过多,必然导致 OOM,并且线程太多,反而会因为频繁上下文切换导致性能降低
可以采用线程池技术来减少线程数和线程上下文切换,但治标不治本,如果有很多连接建立,但长时间 inactive,会阻塞线程池中所有线程,因此不适合长连接,只适合短连接(见1.2线程池版 )
验证示例:
Server1代码
import java.io.IOException;
import java.net.InetSocketAddress;
import java.nio.ByteBuffer;
import java.nio.channels.ServerSocketChannel;
import java.nio.channels.SocketChannel;
import java.util.ArrayList;
import java.util.List;

import static cn.wenyuan.ByteBufferUtil.debugRead;

public class Server1 {
    public static void main(String[] args) throws IOException {
        // 创建ByteBuffer
        ByteBuffer buffer = ByteBuffer.allocate(16);
        // 1. 创建服务器
        ServerSocketChannel serverChannel = ServerSocketChannel.open();
        // 2. 绑定监听端口
        serverChannel.bind(new InetSocketAddress(8080));
        // 3. 创建连接集合
        List<SocketChannel> channelList = new ArrayList<>();
        while (true) {
            System.out.println("等待连接...");
            // 4. accept 建立与客户端连接, SocketChannel用来与客户端通信
            SocketChannel sc = serverChannel.accept();
            System.out.println("已连接客户端: " + sc);
            channelList.add(sc);
            // 5. 遍历接收每个客户端发送的数据
            for (SocketChannel channel : channelList) {
                System.out.println("读取客户端信息之前");
                channel.read(buffer);
                buffer.flip();
                debugRead(buffer);
                buffer.clear();
                System.out.println("读取客户端消息之后");
            }
        }
    }
}
Client1代码
import java.io.IOException;
import java.net.InetSocketAddress;
import java.nio.channels.SocketChannel;
import java.nio.charset.StandardCharsets;

public class Client1 {
    public static void main(String[] args) throws IOException, InterruptedException {
        SocketChannel socketChannel = SocketChannel.open();
        socketChannel.connect(new InetSocketAddress("127.0.0.1", 8080));
        System.out.println("等待连接...");
        socketChannel.write(StandardCharsets.UTF_8.encode("hello1-1"));
        Thread.sleep(10000);
        socketChannel.write(StandardCharsets.UTF_8.encode("hello1-2"));
        System.out.println("连接结束...");
    }
}
Client2代码
import java.io.IOException;
import java.net.InetSocketAddress;
import java.nio.channels.SocketChannel;
import java.nio.charset.StandardCharsets;

public class Client2 {
    public static void main(String[] args) throws IOException, InterruptedException {
        SocketChannel socketChannel = SocketChannel.open();
        socketChannel.connect(new InetSocketAddress("127.0.0.1", 8080));
        System.out.println("等待连接...");
        socketChannel.write(StandardCharsets.UTF_8.encode("hello2-1"));
    }
}
先启动Server1端, 再启动Client1, 等待Client1的休眠结束之后再启动Client2, 观察Server端日志如下:
等待连接...
已连接客户端: java.nio.channels.SocketChannel[connected local=/127.0.0.1:8080 remote=/127.0.0.1:57818]
读取客户端信息之前
+--------+-------------------- read -----------------------+----------------+
position: [0], limit: [8]
         +-------------------------------------------------+
         |  0  1  2  3  4  5  6  7  8  9  10 11 12 13 14 15|
+--------+-------------------------------------------------+----------------+
|00000000| 68 65 6c 6c 6f 31 2d 31                         |hello1-1        |
+--------+-------------------------------------------------+----------------+
读取客户端消息之后
等待连接...

已连接客户端: java.nio.channels.SocketChannel[connected local=/127.0.0.1:8080 remote=/127.0.0.1:51818]
读取客户端信息之前
+--------+-------------------- read -----------------------+----------------+
position: [0], limit: [8]
         +-------------------------------------------------+
         |  0  1  2  3  4  5  6  7  8  9  10 11 12 13 14 15|
+--------+-------------------------------------------------+----------------+
|00000000| 68 65 6c 6c 6f 31 2d 32                         |hello1-2        |
+--------+-------------------------------------------------+----------------+
读取客户端消息之后
读取客户端信息之前
+--------+-------------------- read -----------------------+----------------+
position: [0], limit: [8]
         +-------------------------------------------------+
         |  0  1  2  3  4  5  6  7  8  9  10 11 12 13 14 15|
+--------+-------------------------------------------------+----------------+
|00000000| 68 65 6c 6c 6f 32 2d 31                         |hello2-1        |
+--------+-------------------------------------------------+----------------+
读取客户端消息之后
等待连接...
其中Client1的hello1-1 信息率先被打印出来, 之后由于Client1休眠导致Server1没有数据可读, read会阻塞, 即使Client1发送了hello1-2 , Server1也不会打印出来.
直到Client2连接, Server1按顺序处理完Client1的hello1-2 , 之后再处理Client2的hello2-1 信息.
3.1.2 非阻塞
非阻塞模式下,相关方法都会不会让线程暂停
在 ServerSocketChannel.accept 在没有连接建立时,会返回 null,继续运行
SocketChannel.read 在没有数据可读时,会返回 0,但线程不必阻塞,可以去执行其它 SocketChannel 的 read 或是去执行 ServerSocketChannel.accept
写数据时,线程只是等待数据写入 Channel 即可,无需等 Channel 通过网络把数据发送出去
但非阻塞模式下,即使没有连接建立,和可读数据,线程仍然在不断运行,白白浪费了 cpu
数据复制过程中,线程实际还是阻塞的(AIO 改进的地方)
验证示例
Server2代码
import java.io.IOException;
import java.net.InetSocketAddress;
import java.nio.ByteBuffer;
import java.nio.channels.ServerSocketChannel;
import java.nio.channels.SocketChannel;
import java.util.ArrayList;
import java.util.List;

import static cn.wenyuan.ByteBufferUtil.debugRead;

public class Server2 {
    public static void main(String[] args) throws IOException {
        // 创建ByteBuffer
        ByteBuffer buffer = ByteBuffer.allocate(16);
        // 1. 创建服务器, 设置为非阻塞模式
        ServerSocketChannel serverChannel = ServerSocketChannel.open();
        serverChannel.configureBlocking(false);
        // 2. 绑定监听端口
        serverChannel.bind(new InetSocketAddress(8080));
        // 3. 创建连接集合
        List<SocketChannel> channelList = new ArrayList<>();
        while (true) {
            // 4. accept 建立与客户端连接, SocketChannel用来与客户端通信
            SocketChannel sc = serverChannel.accept();
            if (sc != null) {
                System.out.println("已连接客户端: " + sc);
                // 设置为非阻塞模式
                sc.configureBlocking(false);
                channelList.add(sc);
            }
            // 5. 遍历接收每个客户端发送的数据
            for (SocketChannel channel : channelList) {
                int readLength = channel.read(buffer);
                if (readLength > 0) {
                    buffer.flip();
                    debugRead(buffer);
                    buffer.clear();
                    System.out.println("读取客户端消息之后");
                }
            }
        }
    }
}
Client1代码
import java.io.IOException;
import java.net.InetSocketAddress;
import java.nio.channels.SocketChannel;
import java.nio.charset.StandardCharsets;

public class Client1 {
    public static void main(String[] args) throws IOException, InterruptedException {
        SocketChannel socketChannel = SocketChannel.open();
        socketChannel.connect(new InetSocketAddress("127.0.0.1", 8080));
        System.out.println("等待连接...");
        socketChannel.write(StandardCharsets.UTF_8.encode("hello1-1"));
        Thread.sleep(10000);
        socketChannel.write(StandardCharsets.UTF_8.encode("hello1-2"));
    }
}
Client2代码
import java.io.IOException;
import java.net.InetSocketAddress;
import java.nio.channels.SocketChannel;
import java.nio.charset.StandardCharsets;

public class Client2 {
    public static void main(String[] args) throws IOException, InterruptedException {
        SocketChannel socketChannel = SocketChannel.open();
        socketChannel.connect(new InetSocketAddress("127.0.0.1", 8080));
        System.out.println("等待连接...");
        socketChannel.write(StandardCharsets.UTF_8.encode("hello2-1"));
    }
}
先启动Server2端, 再启动Client1, 在Client1休眠结束前迅速启动Client2, 观察Server2端日志如下:
已连接客户端: java.nio.channels.SocketChannel[connected local=/127.0.0.1:8080 remote=/127.0.0.1:34374]
+--------+-------------------- read -----------------------+----------------+
position: [0], limit: [8]
         +-------------------------------------------------+
         |  0  1  2  3  4  5  6  7  8  9  10 11 12 13 14 15|
+--------+-------------------------------------------------+----------------+
|00000000| 68 65 6c 6c 6f 31 2d 31                         |hello1-1        |
+--------+-------------------------------------------------+----------------+
读取客户端消息之后
已连接客户端: java.nio.channels.SocketChannel[connected local=/127.0.0.1:8080 remote=/127.0.0.1:34390]
+--------+-------------------- read -----------------------+----------------+
position: [0], limit: [8]
         +-------------------------------------------------+
         |  0  1  2  3  4  5  6  7  8  9  10 11 12 13 14 15|
+--------+-------------------------------------------------+----------------+
|00000000| 68 65 6c 6c 6f 32 2d 31                         |hello2-1        |
+--------+-------------------------------------------------+----------------+
读取客户端消息之后
+--------+-------------------- read -----------------------+----------------+
position: [0], limit: [8]
         +-------------------------------------------------+
         |  0  1  2  3  4  5  6  7  8  9  10 11 12 13 14 15|
+--------+-------------------------------------------------+----------------+
|00000000| 68 65 6c 6c 6f 31 2d 32                         |hello1-2        |
+--------+-------------------------------------------------+----------------+
读取客户端消息之后
其中Client1的hello1-1 信息率先被打印出来, 之后Client1开始休眠而Client2穿插进来的hello2-1被打印出来, 等Client1休眠结束再次发送的hello1-2 也会打印出来.
3.1.3多路复用
单线程可以配合 Selector 完成对多个 Channel 可读写事件的监控,称之为多路复用
多路复用仅针对网络 IO、普通文件 IO 没法利用多路复用
如果不用 Selector 的非阻塞模式,线程大部分时间都在做无用功,而 Selector 能够保证
有可连接事件时才去连接
有可读事件才去读取
有可写事件才去写入
限于网络传输能力,Channel 未必时时可写,一旦 Channel 可写,会触发 Selector 的可写事件
3.2 Selector
好处
一个线程配合 selector 就可以监控多个 channel 的事件,事件发生线程才去处理。避免非阻塞模式下所做无用功
让这个线程能够被充分利用
节约了线程的数量
减少了线程上下文切换
3.2.1 创建
import java.nio.channels.Selector;

Selector selector = Selector.open();
3.2.2 绑定Channel事件
也称为注册事件,绑定的事件才会被selector 关心.
ServerSocketChannel ssc = ServerSocketChannel.open();
ssc.configureBlocking(false);
ssc.bind(new InetSocketAddress(8080));

SelectionKey sscKey = ssc.register(selector, SelectionKey.OP_ACCEPT, null);
channel 必须工作在非阻塞模式
FileChannel 没有非阻塞模式,因此不能配合 selector 一起使用
绑定的事件类型可以有
connect - 客户端连接成功时触发
accept - 服务器端成功接受连接时触发
read - 数据可读入时触发,有因为接收能力弱,数据暂不能读入的情况
write - 数据可写出时触发,有因为发送能力弱,数据暂不能写出的情况
3.2.3 监听Channel事件
可以通过下面三种方法来监听是否有事件发生,方法的返回值代表有多少 channel 发生了事件:
方法1,阻塞直到绑定事件发生
int count = selector.select();方法2,阻塞直到绑定事件发生,或是超时(时间单位为 ms)
int count = selector.select(long timeout);方法3,不会阻塞,也就是不管有没有事件,立刻返回,自己根据返回值检查是否有事件
int count = selector.selectNow();
3.2.4 Select何时不阻塞
事件发生时
客户端发起连接请求,会触发 accept 事件
客户端发送数据过来,客户端正常、异常关闭时,都会触发 read 事件,另外如果发送的数据大于 buffer 缓冲区,会触发多次读取事件
channel 可写,会触发 write 事件
在 linux 下 nio bug 发生时
调用 selector.wakeup()
调用 selector.close()
selector 所在线程 interrupt